4 Types of water dispenser damage and how to fix it
Complete guide to repairing damage to Water Heater Dispenser. On this occasion, I will discuss on how to fix various damage to the water dispenser or water heater and cooler.
One of the most frequent damage experienced by dispensers, is the water that leaks and flows around the surface of the dispenser machine.
Such damage, usually occurs due to the imbalance and slope of gallons of water and gallon retainers shaped like funnels.
How to fix it is quite easy, you just look at the part that is thought to be tilted between the gallon and gallon holder.
Usually there is something that is tantalizing among them, you just clean it, the stuff that is crammed if it still leaks, please buddy try to change the gallon, and also the gallon holder that buddy has.
Maybe there was a misprint and an imbalance. And most often. However, there are many more damage – damage that can occur to the water dispenser including:
- Total Dead water dispenser
- Water Dispenser Not hot
- Water dispenser Not cold
- Leaking water dispenser
Read Also: 13 Recommendations for the Most Quality Bottom Gallon Dispenser for Home
1. Fix dispenser that is completely dead.
To repair the damage is a bit difficult, because you have to open the back body and check the electrical current line inside.
Before doing so, prepare the following tools that can help the following:
- AVO meter as gauge and checker of damaged parts
- Screwdriver – and + as a bolt opener covering the part to be inspected
- Scissors and pliers as a cable cutting tool.
- Tape to cover the peeled part
After you have prepared the tools I mentioned above, the next step is to open the back body of the water dispenser, and look at the cable channels that are there, perhaps some have been broken and damaged.
Damage usually occurs due to rat activity that often damages and makes nests in water dispensers.
If you see that one of the cables has broken, then please reconnect it.
However, if it is visible on the inside of the dispenser is still in good condition, take measurements using the AVOmeter
Preparing the AVOmeter
Position the switch selector on the OHM measurement scale, calibrate!.
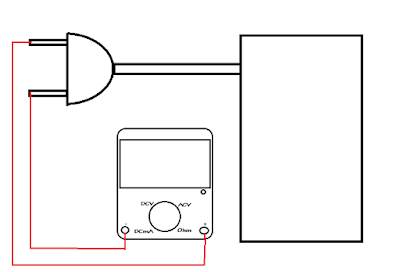
AVO meter on the plug section of the water dispenser.
 |
| Measurement images using the avometer directly |
 |
| simulation images for clarity |
Look at the screen on the AVOmeter
Avo meter / Multimeter will experience 3 possibilities that will definitely happen
An example of the Avo Meter calibration can be seen in the picture:
For example when you connect both terminal needles with both plugs/sockets on the current cable part of the dispenser, and the switch on.
It is necessary to recall once again this examination, carried out with the switch selector on the AVO meter / multitester there in the state of ohm meter measuring scale.
Your leftmost image shows, before the connection is done and when the avometer examination is still the same as before (the needle does not move at all) without any reaction, shows there is a part of the connection that is disconnected either on the cable or part of the component in it.
after the examination with the avometer avo meter, and the result is as shown by the middle image, it shows a component goes well, because there is no short circuit and no part is disconnected.
Well back to the discussion....
In the rightmost image you see, the directional needle on the screen moves full, indicating that there is a short circuit that results in an electronics not running normally, even the MCB at home will trip.
However, I think this kind of damage is rare, If after checking the electric current from the plug into the dispenser is damaged, characterized by no calibration on the AVOmeter screen needle, then perform a check of the power cord.
To check the electrical cable part please note the picture below:
Connect one of the terminal needles + at the end of the cable located inside the dispenser, and the terminal needle – on the plug
Then there will be 2 possibilities that will happen on the AVOmeter screen that is full calibration means good, and the second is not calibration at all. However, do not think that the cable is damaged because there are still two possibilities:
There is damage (disconnected) on the cable part and There is a wrong choice of the end of the cable that can be above by moving the terminal needle + inside the dispenser at the other end of the cable.
If you have done the electrical cable inspection but still do not get a dizzying result aka still DEAD TOTAL, please check the heating or cooling part on the dispenser.
2. Fixing Disepenser water that is not Hot.
As usual, check using ohm-mode Avometer, making it easier to find the part that is disconnected, such as the Thermostat that is shaped like a flying saucer.
Continued by checking the heater that is usually inside the heating tube, you just check the socket part. (using AVO meter)
If there is a damaged part, which is marked by the non-calibrating of the pointer needle on the avo meter screen, then the next step is to repair the cable connection. Maybe something's broken.
But it can also be by replacing those components with new ones. New electrical goods (components) can be obtained at the electronics STORE.
3. Fixing Disepenser is not cold.
To repair damage to the cooling part, all you have to do is check the module (circuit) that serves as a change of AC current to DC (direct current), or it can be called a Power supply, power supply unit, or adapter.
Check the fan connection by connecting the avometer needle to the cable connection part of the Power suplay that leads to the fan (there are usually two cables).
If there is a disturbance in the power suplay part, pay attention to any existing electronic components such as capacitors, resistors and transformers and others, usually the damage is characterized by blanks or erupts.
Please replace it with the same specifications.
4. Fix Leaking Dispenser.
To Fix the aqueduct in the dispenser (water heater) buddy need to check each hose in the dispenser, if the hose is open or loose, please tighten using a tie cable.
Where are the hoses located?
The location of the hose on the disepenser is certainly inside the dispenser so, to repair this damage buddy must disassemble the dispenser buddy and do the inspection by:
- Give water to the top area to see the flow of water inside the dispenser
- periksi per section, whether something is wet or not
- If you have met please tighten it using cable ties
- But if the leak is in the middle of the hose, buddy can create his own in overcoming the leak.
Fix leak in gallon dispenser area
although actually this discussion I have explained early, but because of the worry buddy missed reading it, we made it clear again, To fix the leak in the gallon area under the dispenser, the first thing to pay attention to is how to install the gallon.
should install gallons on the dispenser neatly (should not be tilted)
second, pay attention to the components that are shaped like the funnel. see if the components are marijuana or uneven...
If it is uneven can be replaced, the spare parts can be found in the Electrical Home Appliances Store
however, if the funnel is still good, try replacing the gallon, because based on our experience fixing the dispenser as it is the difference between a gallon basin and a funnel on a dispenser.
Thus this article I wrote, hopefully it can be useful and can help the problem buddy.
We need help buddy, by sharing this article to various social media, will be very helpful to us in developing the blog of these technicians.


Thanks for sharing such an informative blog! All the details you mentioned might helpful for a lot of peoples. Do you want to purchase the most trending water filtration products in Connecticut? Clearwater of New England brings you the best bottleless water dispensers for businesses in Connecticut at very cheap prices.
BalasHapusBest Water Purifier in India For Home
BalasHapusHot and Cold Water Purifier
Best copper Water Purifier in India
Water Dispenser with RO System